...
| icon | false |
|---|
| Table of Contents |
|---|
Introduction
This information covers the installation steps needed to install and configure the FuseIT S4S connector.
|
...
Audience
...
|
IMPORTANT: Proceed down this path only if you have Sitecore 8.2 or earlier |
Introduction
This wiki covers the steps needed to install and configure the FuseIT S4S connector. The audience for this section is developers and implementers with experience in installing and configuring Sitecore. Experience with Salesforce is should not be required.
Scope
This document describes how to install FuseIT S4S Packages and not how to sett up and configure Salesforce or Sitecore.
S4S Installation Overview
Basic Install
The basic install requires a package to be installed into Sitecore and some minor Salesforce customization. Once completed you can create, read, update and delete Salesforce objects from Sitecore (like Contacts, Leads, Opportunities, Documents, Cases or custom objects). You can execute this functionality in Sitecore using custom code (see the Starter Kit or examples in this document). Note that S4S typically pushes and pulls information to and from Salesforce after a Sitecore event (button click, page load, scheduled task etc.).
...
...
IMPORTANT: The basic install assumes your Sitecore installation has the Web Forms for Marketer (WFFM) package installed. You need to install WFFM first, then install the S4S Core package. If you are not using WFFM, see the section below on how to exclude WFFM.
Web Forms for Marketers (WFFM)
If you have the Sitecore WFFM module installed and you want to push WFFM form data to Salesforce, S4S has a mapping wizard to make this easy.
When creating the Sitecore WFFM form choose the required custom Save Actions to push the form data to Salesforce. The installed Save Actions are:
- S4S Generic Mapping: This Save Action maps WFFM fields to any object in Salesforce. For person objects, you can use the wizard to automatically add a new Salesforce lead or contact to a Salesforce campaign.
- S4S Push Visitor: This Save Action maps WFFM fields to Salesforce Contacts or Leads only. This action pushes the form data to Salesforce, and the Sitecore xDB data associated with the visitor's activities on the website. This requires several custom receiver fields in Salesforce.
In the Sitecore tree, Save Actions are installed at
| Section |
|---|
/sitecore/system/Modules/Web Forms for Marketers/Settings/Actions/Save Actions |
If one of these Save Actions is selected, the published WFFM form will appear in the S4S Mapping Wizard which is accessible from the Sitecore Start menu. Developers can build custom Save Actions to improve WFFM validation and functionality when connecting to Salesforce. See the dedicated section to learn more about the S4S Web Forms for Marketers functionality.
Security Connector
![]() IMPORTANT: The Security Connector is only required if you are using a custom login control.
IMPORTANT: The Security Connector is only required if you are using a custom login control.
...
How to Use this Wiki
We recommend you use the Next Step link at the bottom of each page. Always check that the feature you are installing is required by your business (optional features are marked Optional).
| Tip | ||
|---|---|---|
| ||
The connector has many options - most will NOT be required.Use the S4S Installation Chart to ensure you only install what is needed. |
Scope
This wiki describes how to install FuseIT S4S Packages and not how to set up and configure Salesforce or Sitecore.
Terms
Optional
This term means the feature is available in S4S (out-of-the-box) but should not be installed unless required.
Security Connector
The Security Connector is optional. It is only required if you want visitors to log into the Sitecore website using credentials stored in a Salesforce Contact or Lead record. It requires a package to be installed in Salesforce.
The Security Connector overrides the ASP.NET membership provider so user data is only stored in Salesforce but appears in Sitecore in the “Salesforce” domain. This is commonly called "a single source of truth". After installing the Security Connector it is possible to control the Sitecore user's membership information, role, and profile from Salesforce. The most common way to implement roles is called "Multi-role" where fields in the Salesforce contact (or lead) record specify the Sitecore role. One or more Sitecore roles have the same names as selections in a custom multi-pick list in the Salesforce contact (or lead).
![]() IMPORTANT: The Security Connector is only required if you are using a custom login control. A typical use would be allowing privileged customers, or internal staff, to access Sitecore portal pages.
IMPORTANT: The Security Connector is only required if you are using a custom login control. A typical use would be allowing privileged customers, or internal staff, to access Sitecore portal pages.
Web Forms for Marketers (WFFM)
If you are using a Sitecore WFFM and need to push web form data to Salesforce, S4S includes a significant functionality to support this.
S4S Installation Overview
Basic Install
The basic install requires a package to be installed into Sitecore and some minor Salesforce customization. Once completed you can create, read, update and delete Salesforce objects from Sitecore (like Contacts, Leads, Opportunities, Documents, Cases or custom objects). You can execute this functionality in Sitecore using custom code (see the Starter Kit or examples in this document). Note that S4S typically pushes and pulls information to and from Salesforce after a Sitecore event (button click, page load, scheduled task etc.).
IMPORTANT: This basic install assumes your Sitecore installation has the Web Forms for Marketer (WFFM) package installed. If you want to use WFFM, you need to install WFFM first, then install the S4S Core package. If you are not using WFFM see the section below on how to exclude WFFM. |
Excluding Web Forms for Marketers
The basic install of S4S assumes you have the Web Forms for Marketer package installed. If you are not using WFFM, you should remove WFFM from the installation package before installing S4S. To do this, open the core zip file and note the Web Form for Marketers item in the following node:
| Section |
|---|
| Sitecore For Salesforce-Core-1.7.13344.1[version number].zip\items\master\sitecore\system\Modules |
You cannot directly delete this item without a security message so extract the entire zip to a new unzipped Sitecore for Salesforce - Core-x.x folder then drill down and delete the WFFM item. Next, delete package.zip out of the original zip file and drag the entire modified package.zip across to the original. Install the modified zip as normal.
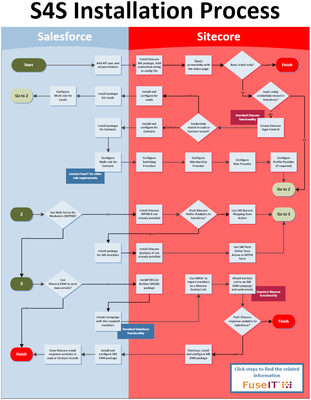
S4S Installation Chart
Please follow the steps in the S4S Installation Chart to save time and effort. Click the image below to download the PDF version.
Next Step
S4S Version Compatibility with Sitecore (Pre-Sitecore 9)
Steps
| Child pages (Children Display) | ||
|---|---|---|
|