...
Create a Self-Signed Certificate in Salesforce to associate with your connected app.
Setup > Quick Find “Certificate” > Certificate and Key Management
Click “Create Self-Signed Certificate”
Enter a name in the Label and Unique Name fields. Note this down for use later.
Ensure “Exportable Private Key” is selected
Ensure “Key Size” is 2048
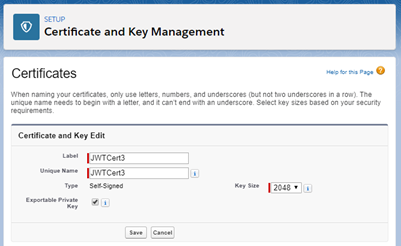

Click “Save” to continue to the next page.
Click “Download Certificate” to get the .crt file we will use for the connected app.
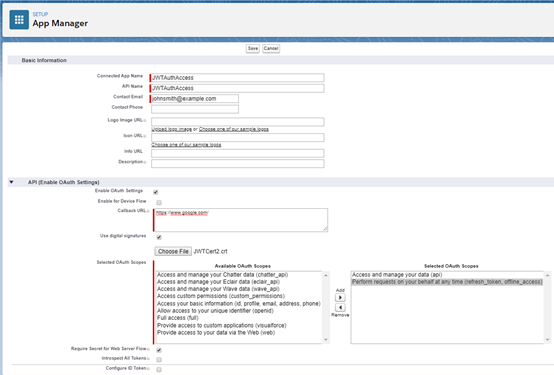
Create the connected app in your target org:
Setup > Quick Find “Apps” > App Manager > New Connected App
Enter a name and email for the app
Enable OAuth Settings
Enter a Callback URL (https://www.google.com will work if needed)
Ensure ‘Use digital signatures’ is selected.
Upload the certificate .crt file that was just downloaded.
Under Available OAuth Scopes, add the following:
Access and manage your data (api)
Perform requests on your behalf at any time (refresh_token, offline_access)
Leave everything else with the default options, click Save.

Note that it may take up to 10 minutes for the app to work. Click Continue.
Note down the “Consumer Key” value that was generated, to be used later. Pasting it into a sticky note might be a good idea.
Click “Manage”
Click “Edit Policies”
Under OAuth Policies, set Permitted Users to “Admin approved users are pre-authorized”.
Save.
Now go down and click on “Manage Profiles”. Add the profiles that you want to be able to use login with the Bearer flow, and Save. For me, selecting System Administrator was enough to allow login.
Export the connected app’s certificate:
Setup > Quick Find “Certificate” > Certificate and Key Management
Click “Export to Keystore”. Enter a password. Note this down as ‘source password’.[1]
Click “Export”. A Java Key Store file will be downloaded.
Next, we need to convert this file to a format that Windows recognises.
...